
So you’ve got your domain name registered and now looking for how to set it up with a new hosting server? This is not something that’s very tough to do. In this tutorial, we’d try to be straightforward in explaining everything the way everyone is going to understand.
Setting up a new hosting account for your domain
Here are the few steps to take in setting up your business, group or personal domain name to work with the hosting account you’ve bought for it.
The tips here are going to work, irrespective of the kind of hosting setup you’re planning to get for it. I.e., it can be shared, VPS hosting, Managed WordPress hosting, Cloud hosting, premium VPS hosting, or a dedicated server.
First Step: Get a reliable host
The first thing to do is to get a reliable host that won’t disappoint you when you’re caught up. There are lots of hosting services providers and deciding on which one to go for can be complicating. However, with the correct research and reviews, you’re going to get the one that’s going to work great for your business.
The popular hosting option for small businesses is shared hosting, managed WordPress hosting, Cloud Hosting, and VPS hosting.
Second step: point your domain nameservers
When you have finally purchased a hosting plan from your preferred hosting service provider, then, you’d have to point your domain to the new hosting account by changing the default name servers to that of the new host provider.
How to change my name servers?
- Log on to your initial domain name provider website, navigate and click on the “domains” tab
- Further, click on “manage” domains
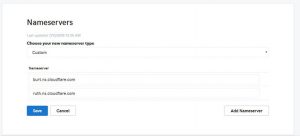
- Carefully look out for the nameserver section and click on “change“
- Now, choose “custom“
Usually, your domain name servers are set to “default”. So, you need to change it from “Default” to “Custom” in other for it to connect with the new host you just bought.
- Paste the new name servers offered to you by the new hosting provider. Depending on your new host provider, this is how nameservers look like; dns2.namecheaphosting.com, and dns1.namecheaphosting.com or ns1.bluehost.com and ns2.bluehost.com
Note: Name servers follow each other serially. E.g. ns1 goes with ns2, dns01 goes with dns02, except for custom nameservers.
What More?
After pointing the nameservers, log in to the new host and see if everything went successfully. Normally, it takes a few minutes before your domain starts pointing to the new host. But in some cases, the pointing may take up to hours; this is because the internet needs to recognize your new Nameservers.
Once everything is working as supposed, you can decide to install WordPress, Joomla, Drupal, or other website building CMS or give the details to a web developer to design the website according to your business needs.


Comments